Are you curious to know about How to fix laptop startup problem?.
Well. This article provides useful troubleshooting steps regarding the same.
Tips On How To Fix Laptop Startup Problem
Laptop startup problems are becoming increasingly common as more and more people use their computers for tasks that require more power than a standard laptop can provide.
If you are clueless on How to fix laptop startup problem, then read this article for you to get better visibility about the solution you need to follow to fix the issue instantly.
While there are many ways to speed up your laptop’s startup process, there are a few basic tips that can help you troubleshoot and fix the most common startup problems.
1. Check Battery and ensure Laptop is properly Plugged in
If your laptop won’t turn on or boot up, the first thing you should do is make sure that the laptop is properly plugged in.
If the laptop is plugged in but still won’t power on, try holding down the power button for 30 seconds.
If that doesn’t work, try removing the battery and then reinserting it.
2. Check Display
If it doesn’t solve the issue, the first thing you should do is check the display.
If you can see the display, then the problem is likely with the operating system or a piece of software.
If you can’t see the display, the problem is likely hardware-related.
If your laptop powers on but won’t boot up, and you can see the display, the first thing you should do is check to see if any of the hardware devices are disconnected.
This includes the power cord, the hard drive, the optical drive, and any external devices.
If any of these devices are disconnected, reconnect them and then try to boot up again.
If these basic tips can’t solve your issue, you can move forward and try these advance techniques listed below.
3. Check Bios Settings
If your laptop is taking longer than usual to start up, the first thing you should do is check the BIOS settings.
Many times, laptops are shipped with the wrong BIOS settings, which can cause startup problems.
- To access your BIOS settings, press the F2 key while your computer is booting up.
- Once you’re in the BIOS menu, look for the “Boot Order” or “Boot Priority” settings.
- Make sure that your hard drive is listed as the first boot device.
- If it’s not, move it to the top of the list and save your changes.
4. Check Boot Settings
The next thing you should do is check the boot sequence in your operating system.
- In Windows, this can be done by going to the Start menu, then selecting “All Programs,” “Accessories,” “System Tools,” and “System Configuration”
- Once you’re in the System Configuration window, click on the “Boot” tab and make sure that your hard drive is listed as the first boot device.
5. Run Startup Repair
If you’re having trouble starting up your laptop, it’s possible that you have a problem with your startup repair.
This can be a frustrating issue to deal with, but fortunately there are some things you can do to try and fix it. First, it’s important to understand what startup repair is and how it works.
Startup repair is a feature of Windows that can help fix certain types of problems that might prevent Windows from starting correctly.
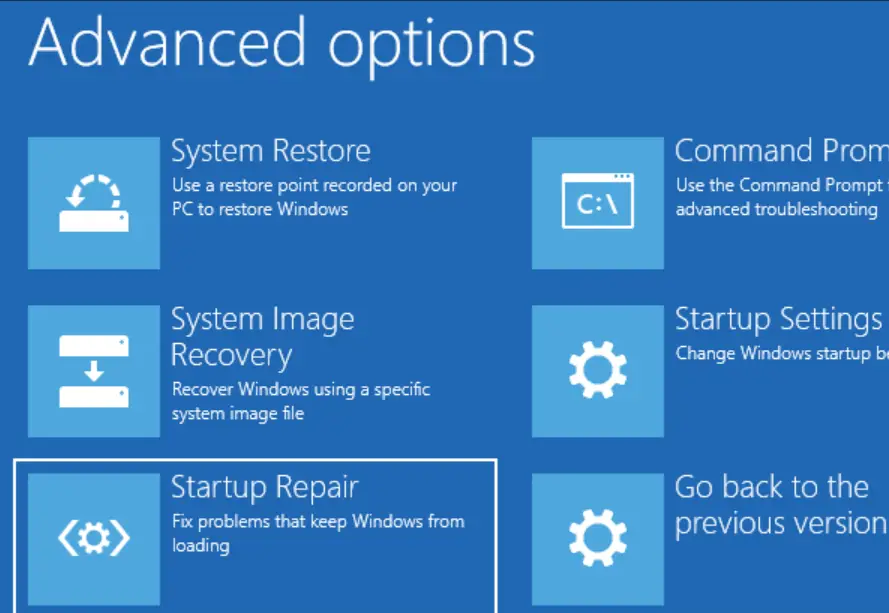
When startup repair is run, it will scan your system for any problems and attempt to fix them automatically. One common issue that can cause startup repair to fail is a corrupt registry.
The registry is a database that stores information about all the software on your computer.
If this database becomes corrupt, it can prevent Windows from being able to start up properly.
There are a few different ways to fix a corrupt registry, but the most effective way is to use a professional Registry Cleaner tool.
Another common issue that can cause startup repair to fail is missing or corrupted system files.
These files are responsible for storing critical information about your operating system and its settings.
If they become damaged or corrupted, it can prevent Windows from being able to start up correctly.
There are various ways to replace or restore these files, but the most effective way is to use a professional System File Repair tool.
If you’ve been having trouble starting up your laptop recently and suspect that startup repair might be the culprit, then there are some things you can do to try and fix the problem yourself.
However, if you’re not comfortable working with the Registry or replacing system files manually, then the best thing to do would be to seek out professional help from an IT technician or computer specialist.
6. Reset your PC
If your computer is having issues and you want to reset it back to how it was when you first got it, you can do a factory reset.
This will erase everything on your computer and restore it to the way it was when it came out of the factory.
If you bought a used computer, you may want to do a factory reset to get rid of any programs or data that the previous owner had on there.
- To do a factory reset, you will need to have a Windows installation disc or USB drive. If you don’t have one, you can download a Windows ISO file and burn it to a disc or USB drive.
- Once you have the Windows installation disc or USB drive, boot your computer from it.
- If you’re not sure how to do this, you can look it up online for your specific computer model.
- Once your computer is booted from the disc or USB drive, you will see a screen that says “Welcome to Setup.”
- Press the Enter key to continue. On the next screen, you will be asked if you want to “Install now” or “Repair your computer.” Choose “Install now.”
- On the next screen, you will be asked to enter your product key.
- If you don’t have a product key, you can skip this step and enter it later.
- On the next screen, you will be asked to choose the edition of Windows that you want to install.
- Choose the edition of Windows that you have a license for. On the next screen, you will be asked to choose the “Custom” installation type.
- On the next screen, you will see a list of all the partitions on your hard drive.
- If you want to do a clean install of Windows, you will need to delete all of these partitions.
- To do this, select each partition and then click the “Delete” button.
- Once all of the partitions are deleted, you will see one unallocated partition. This is where Windows will be installed.
- Click on the unallocated partition and then click the “Next” button.
- On the next screen, you will be asked if you want to format the partition.
- Choose the “Format” option and then click the “Next” button.
- On the next screen, you will be asked to choose the file system.
- Choose the “NTFS” file system and then click the “Next” button.
- Windows will now start installing itself on the unallocated partition.
- Once Windows is done installing, you will be prompted to create a user account.
- Enter the information for the user account and then click the “Next” button.
- On the next screen, you will be asked to choose a computer name.
- Enter a name for your computer and then click the “Next” button.
- On the next screen, you will be asked to set a password for your user account.
- Choose a password and then click the “Next” button.
- On the next screen, you will be asked to enter your time zone.
- Choose your time zone and then click the “Next” button.
- On the next screen, you will be asked to choose your network type.
- If you’re not sure, you can usually leave this setting as the “Work network”
- Once you’ve made your selections, click the “Next” button.
- Windows will now finish the installation and then reboot your computer.
- Once your computer has rebooted, you will be able to log into your user account and start using your computer.
7. Run a disk Clean Up
Your PC’s hard drive is a magnet for digital dirt and grime.
Over time, as you download and save new files, install and uninstall programs, and surf the web, your hard drive can become cluttered with digital detritus that can slow down your PC.
But there’s an easy way to clean up your hard drive and speed up your PC-just use a disk cleanup utility.
Disk cleanup utilities scan your hard drive and identify files that can be safely deleted without harming your system or affecting your personal files.
They then present you with a list of files to be deleted and give you the option to select which files you want to delete.
Once you’ve made your selections, the disk cleanup utility will delete the selected files and free up space on your hard drive.
There are a number of disk cleanup utilities available, but we recommend using the built-in disk cleanup utility in Windows.
- To access the disk cleanup utility in Windows 10, 8, and 7, open the Start menu and type “disk cleanup.” Select the “Disk Cleanup” app from the list of results.
- In the “Disk Cleanup” window, select the type of files you want to delete.
- The options available will vary depending on which version of Windows you’re using. In general, you can safely delete any file listed in the “Temporary files” section.
- If you’re not sure about a file, you can right-click it and select “Properties” to view more information about the file.
- Once you’ve made your selections, click “OK” to delete the selected files.
- If you want to free up even more space on your hard drive, you can also delete system files.
- To do this, select the “Clean up system files” option in the “Disk Cleanup” window.
- This will open a new window listing additional types of files that can be deleted.
- As with the “Temporary files” category, we recommend that you only delete system files that you’re sure you don’t need.
- For example, you can safely delete temporary Windows files, but you shouldn’t delete critical system files.
- Once you’ve made your selections, click “OK” to delete the selected files.
- After you’ve used a disk cleanup utility to delete temporary files and system files, you can also use it to delete unnecessary programs.
- To do this, select the “Uninstall programs to free up disk space” option in the “Disk Cleanup” window.
- This will open the “Programs and Features” control panel, which you can use to uninstall programs.
- When you’re finished uninstalling programs, click “OK” to close the “Programs and Features” control panel.
Also Read: How To Fix Laptop Charging Problem
Final Words about How To Fix Laptop Startup Problem
Laptop startup problems are very painful to deal with as it can waste your time or delay your important works and harm your workflow.
Hope by now you might have fixed your Laptop Startup problem using above step by step guide.
Leave your comments below.
Incase if you still need help on any other Laptop Issues then please specify it clearly along with error screenshots in comment section.
We will write an detailed article about it in the upcoming days.
Have a great day
LAPTOP BUYING GUIDE 2024
|
|
|

In leisure time, I would spend time in reading and have a cup of coffee.
- 10 Best Laptop for Laser Engraving AMD Intel 2025 - March 9, 2024
- 11 Best Laptop for Mechanics Intel AMD 2025 - March 9, 2024
- 12 Best Laptops for Tattoo Artists 2025 - March 7, 2024


