Are you clueless about how to remove pressure marks on Laptop LCD screen?
Then follow this guide and remove pressure marks on the Laptop LCD screen easily.
Also Read: Best Black Friday Gaming Laptop Deals
How to Remove Pressure Marks on Laptop LCD Screen
In the modern era, laptops have become indispensable in our lives, serving as windows to the digital world.
However, they are not immune to wear and tear despite their convenience.
One common issue laptop users encounter is pressure marks on the LCD screen.

So in this guide, we will teach How to Remove Pressure Marks on Laptop LCD Screen.
These unsightly marks can be a cause for concern, but fear not, for in this guide, we will embark on a creative journey to explore effective methods to bid farewell to those pesky pressure marks.
From practical techniques to ingenious solutions, we’ll delve into the world of laptop screen revival and restore the pristine beauty of your digital companion.
Fear not, for this guide unveils a magical journey of restoring your laptop’s visual charm by addressing the persistent issue of pressure marks on the LCD screen.
Delving into the depths of this matter, we’ll explore creative solutions and actionable steps that will remove these marks and rejuvenate your laptop screen’s pristine beauty.
Also Read: Lenovo Vantage Laptop Troubleshooting Guide
A). Understanding Pressure Marks and Their Causes
Before you think about How to Remove Pressure Marks on Laptop LCD Screen, get a better understanding of the Pressure Marks root cause.
Pressure marks on laptop LCD screens are visible distortions caused by physical pressure applied to the screen.
These marks appear as dark spots or discolorations that disrupt the normal display.
They can be a significant nuisance, affecting the overall user experience and potentially reducing the screen’s longevity.
Pressure marks typically emerge due to excessive force or pressure being exerted on the screen.
This can occur when the laptop is stored or carried in a bag with heavy objects, when the lid is closed with an object on the keyboard, or when the screen is pressed too firmly.
The pressure can spread the liquid crystal inside the screen unevenly, resulting in these localized distortions.
These marks are not confused with dead pixels or individual pixel defects that appear as static dots.
Pressure marks are broader and more irregular in shape, often resembling smudges.
Unlike dead pixels, pressure marks may disappear temporarily if the pressure is relieved but can persist if the damage is extensive.
Preventing pressure marks requires careful handling of the laptop.
Avoid placing heavy objects on the closed laptop, and ensure the keyboard area is clear before shutting the lid.
When storing the laptop in a bag, use a protective case or sleeve to cushion against potential pressure.
Additionally, cleaning the screen gently with a soft microfiber cloth can help prevent dirt or debris from causing pressure points.
In conclusion, understanding pressure marks and their causes on laptop LCD screens is crucial for maintaining visual integrity.
These marks result from excessive pressure distorting the liquid crystal inside the screen, leading to visible white or dark spots or discolorations as shown in the below image.
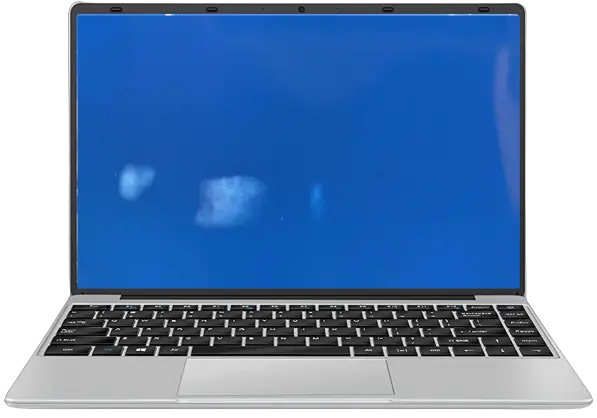
Preventive measures such as careful handling, using protective cases, and regular screen cleaning can help avoid the formation of pressure marks and ensure a clear, uninterrupted display.
Also Read: How To Fix Laptop Startup Problem
B). Gentle Massaging and Heat Application
Gentle massaging and heat application on a laptop LCD screen can harm its functionality and longevity.
Unlike human muscles, the delicate components of an LCD screen are not designed to withstand pressure and heat.
Applying pressure through massaging can lead to pixel damage, dead pixels, or even cracks in the screen.
The heat generated by the laptop during regular usage is typically managed through internal cooling systems.
Adding external heat sources, like heat application through touch or external devices, can disrupt this balance and result in overheating, affecting the overall performance and potentially causing permanent damage to the screen.
Laptop LCD screens are sensitive electronic devices that rely on precise engineering for optimal performance.
The liquid crystals and layers that make up the screen can be easily disturbed by physical force or extreme temperatures.
Attempting to massage the screen or apply heat can lead to uneven distribution of pressure or temperature, resulting in distorted images, color shifts, or irregular backlighting.
To ensure the longevity of your laptop LCD screen, it’s essential to follow manufacturer guidelines for maintenance and care.
Avoid pressing or massaging the screen; never apply external heat sources directly to it.
If you encounter issues with your screen, such as dead pixels or discoloration, it’s best to consult a professional technician rather than attempting DIY solutions that may exacerbate the problem.
In conclusion, treating your laptop LCD screen with care and caution is crucial to maintaining its functionality and appearance.
Gentle massaging and heat application can lead to irreparable damage and should be avoided at all costs.
Instead, focus on regular cleaning and adhering to proper usage guidelines to ensure your laptop screen’s optimal performance and lifespan.
Also Read: Why Does My Laptop Get So Hot When Playing Games
C). Ingenious Eraser Technique
Ingenious Eraser Technique is a clever and cost-effective solution for addressing minor imperfections on laptop LCD screens.
This technique involves using a soft white eraser, similar to those found on pencils, to gently remove smudges, fingerprints, and light scratches from the screen’s surface.
To employ the Ingenious Eraser Technique, follow these simple steps
STEP 1: Turn Off the Laptop
Ensure the laptop is powered off before attempting any cleaning or maintenance on the screen.
This prevents accidental input and reduces the risk of damaging the screen.
STEP 2: Choose the Right Eraser
Opt for a soft white eraser, preferably high-quality.
Avoid using colored erasers or those with abrasive properties, as they could cause further damage.
STEP 3: Gently Rub the Affected Area
Gently rub the eraser over the smudged or scratched area with a soft touch.
Use circular motions and avoid applying excessive pressure.
The eraser’s mild abrasiveness can help lift dirt and grime without causing harm.
STEP 4: Wipe Away Residue
Using a microfiber cloth removes eraser residue from the screen after erasing.
This will leave the screen clean and free of debris.
STEP 5: Turn ON Laptop Now
Power on the laptop and inspect the screen for improvement.
The Ingenious Eraser Technique is most effective for minor issues and may not eliminate deep scratches or major damages.
STEP 6: Repeat the Process if Necessary
If the initial attempt doesn’t yield satisfactory results, you can repeat the process a few times.
However, if the issue persists or worsens, it’s advisable to seek professional assistance or explore other screen-cleaning methods.
It’s important to note that while the Ingenious Eraser Technique can be effective for minor blemishes, it’s not a comprehensive solution for all screen-related problems.
Consulting a professional technician is recommended for more severe issues, such as cracked screens or malfunctioning pixels.
In conclusion, the Ingenious Eraser Technique is a handy trick to have up your sleeve when dealing with minor imperfections on a laptop LCD screen.
Its simplicity and affordability make it worthwhile before considering more extensive repairs or replacements.
Also Read: Best Laptops under $1000
D). The Magic of Pixel Exercising
Pixel exercising, a technique often employed to revive and invigorate laptop LCD screens, is almost magical in its ability to breathe life into seemingly lifeless pixels.
This method displays rapidly changing and vibrant colors across the screen, coaxing stuck or dead pixels back to functionality.
The charm of pixel exercising lies in its simplicity and effectiveness.
In just a few minutes, a laptop’s display can transform remarkably as pixels that appear permanently inactive spring back to life.
This process stimulates the liquid crystals within the LCD panel, encouraging them to reset and resume their proper function.
One can find pixel-exercising tools or videos online to perform this digital enchantment.
These resources guide users through the steps, displaying rapidly shifting colors across the screen.
Watching this colorful dance of pixels is akin to witnessing a spell cast, with the screen flickering through a vibrant array of hues.
The impact of pixel exercising is palpable.
What was once a frustrating cluster of unresponsive pixels can be transformed into a seamless, fully functional display.
This magic-like process provides laptop users with an accessible solution to a common annoyance without needing any physical intervention.
In a world where technology’s intricacies often appear distant and mysterious, pixel exercising is a delightful exception.
Its straightforward approach and tangible results make it a captivating demonstration of how digital magic can resolve a real-world issue.
So, if you find yourself gazing at a lackluster LCD screen plagued by dead or stuck pixels, remember the enchanting technique of pixel exercising.
This magical remedy brings screens back to life with a touch of color and motion.
Also Read: Best Laptops By Budget
Final Words about How to Remove Pressure Marks on Laptop LCD Screen
In laptops, pressure marks on LCD screens are not an uncommon woe.
However, armed with creativity and a dash of innovation, various ways exist to tackle this issue.
From the delicate art of gentle massaging and heat application to the unexpected prowess of erasers and the magic of pixel exercising, we have explored a spectrum of methods to bid farewell to those unsightly marks.
Remember, patience is key.
Hope by now you would have got better visibility on How to Remove Pressure Marks on Laptop LCD Screen.
While these methods can potentially alleviate pressure marks, not all instances might see a complete disappearance of the issue.
In some cases, professional assistance may be necessary.
Nevertheless, by venturing into these creative solutions, you take the first step toward reclaiming the pristine brilliance of your laptop screen.
As you embark on this journey, you not only give your laptop a second chance at a flawless display but also cultivate an innovative mindset that can be applied to various challenges life presents.
Also Read: Best Laptops under $700
LAPTOP BUYING GUIDE 2024
|
|
|

In leisure time, I would spend time in reading and have a cup of coffee.
- 10 Best Laptop for Laser Engraving AMD Intel 2025 - March 9, 2024
- 11 Best Laptop for Mechanics Intel AMD 2025 - March 9, 2024
- 12 Best Laptops for Tattoo Artists 2025 - March 7, 2024


